
How I get my reeds to work by measuring them
History
I started measuring reeds in the mid 1970’s and first had to decide where to measure. I settled on a plan of measuring every 2.5mm up the centre of the reed (9 measurements on my length of reed) and the first 4 measurements halfway between the centre of the reed and the edge. A total of 34 measurements per reed.
Then I needed some reference measurements with which to compare my new reeds. I measured 3 reeds that I thought worked well and averaged all the figures. These I slightly doctored to give a smooth profile.
I soon found that (surprise, surprise) no 2 reeds are quite the same! Could my reference measurements still be used? As they seemed to provide a smooth and even profile I thought that the reference measurements should be scaled by multiplying each reference measurement by a scaling percentage figure.
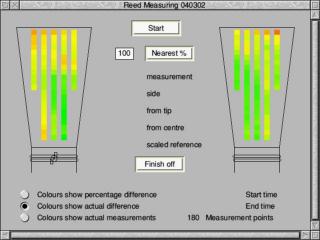
Computers are good at manipulating figures and displaying the calculations in a graphical form that is easy to understand. So I wrote a computer program (for an Acorn computer) that would accept the figures as I measured them and display not only the measurements but also the difference between those measurements and my scaled reference measurements.
The percentage could be changed easily and the differences colour coded on the screen. If the reed was too thin it would be coloured a shade of red with a deeper shade indicating a bigger difference. Too thick parts would be coloured green and if it was just right coloured yellow.
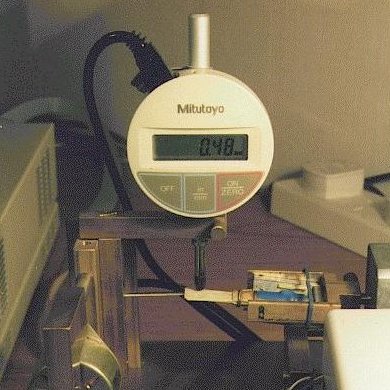
I was still puzzled by some reeds that didn’t work even though they were OK at my measuring positions. I thought that there might be problems in places that I had not looked at. I tried these difficult reeds with measurements on a 2mm grid marked on the reed with pencil. This took a long time but I succeeded in improving these difficult reeds. I had to find some way in which to spread my reference measurements over the whole reed. All but one of the figures for the centre of the reed that I had been working with for a decade turned out to be within a few hundredths of a millimetre of a parabola. I decided to use the same parabola for the entire reed but shifted for the sides since the reed gets thinner as you move from the centre line towards the edge.
Equation

This resulted in my equation:
- y is the distance from the tip of the reed in mm.
- z is the distance from the centre line of the reed towards the edges in mm.
- x is the thickness of the cane at the point y,z in 1/100ths mm.
This is more usefully arranged as:
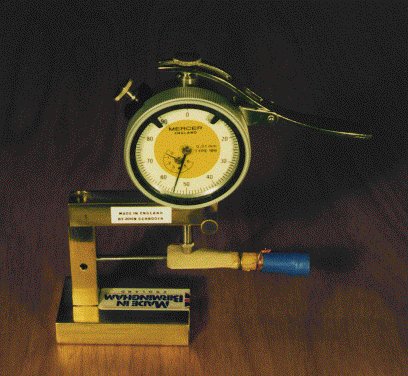
Since it is too much like hard work making over a hundred measurements on one reed I decided that it would be nice if my computer could do the measuring for me. A friend, George Pearce, at Aston University set the problem as a project and an undergraduate took it up and designed the basic layout, though he did not have the equipment to get the necessary accuracy. I followed on from this with my son Peter helping with the electronics. (He is currently working as Head of Systems Engineering for McLaren, the Formula 1 racing team.) I bought a digital dial gauge and, with more help from George, his colleague Anthony Noble, and Andrew Ray, I can get my computer to ask for a measurement and understand the answer!
The computer now controls a stepper motor that turns a thread and makes a carriage move a known distance. One carriage holds the reed and the other holds the dial gauge. They move at right angles to each other so that measurements can be made over all the reed. The computer is given a plan of the positions where to measure, and measures one side of the reed at a time without human intervention. My most detailed measuring scheme makes 686 measurements on one reed! The edges of the reed are difficult to measure even by hand so I don’t let the computer measure too close to them.
Some people say that it is more important to have a reed that sounds good and plays well than one that conforms to some set of measurements. I agree. However I find that I get more reeds to work and sound good by measuring than by guessing. I first started measuring using the computer in 1996. Before using the computer to measure I used 15 reeds in 1 year (1995), but in the decade from 1998 to 2007 I have adjusted 63 new reeds in total and this includes any that weren’t good enough to use! This shows the benefit of computer reed measuring to me. I use fewer reeds than most people but spend more time adjusting them.
My Method of Perfecting Reeds
- Get a reed!
- I bought my reeds from Dominic Weir but lots of people make their own.
- Put on heat shrink plastic binding.
- Gives a good seal even when you mess about with wires a lot
- Can be colour coded so you can tell reeds apart easily
- Colour doesn’t dissolve in vodka! (See Reed Box.)
- Cut blade to 24mm.
- This is shorter than anyone else I know!
- Get the computer to measure.
These pictures show what it looks like on my computer measuring one reed many times.
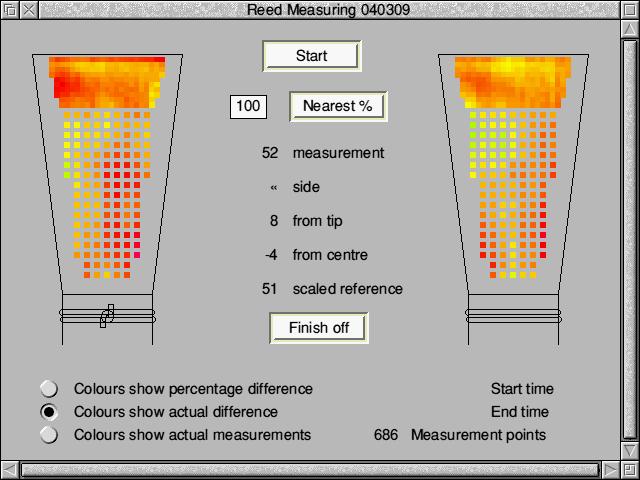
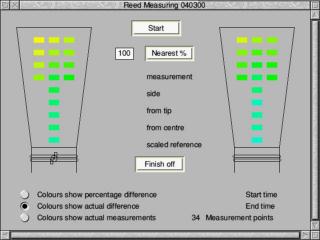 This is the reed as measured before I scraped at all and averages 127% of my reference measurements. I start with only a few measurements (for speed) and increase the number as it gets more critical. The number you see in this first picture is what I used to do by hand.
- Scrape the green bits!
After scraping I measure again with more points. This picture shows the same reed at 110% of my reference measurements.

- Keep scraping the green bits.
More scraping, then I measure again with more points. This picture shows reed at 103% of my reference measurements. This is now at the stage where I blow it for the first time! Usually it is still too strong and I work my way thinner at a rate of 5% of reference measurements at a time.
- Scrape more carefully now.
Now the reed has been scraped to 86% of my reference measurements. It looks very red in this picture since the computer is still working with 100% reference measurements. For the point on the left (first wire twist up) 8mm from the tip and 4mm to the left of the centre line, the measurement is 52 hundredths of a mm with the scaled reference 51 at the same place.
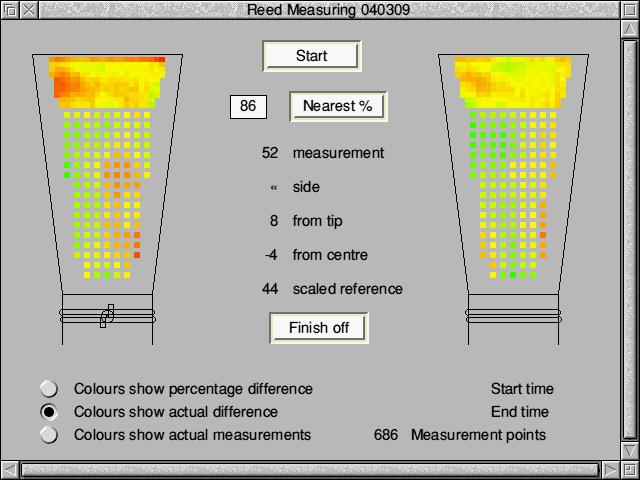
Here is the same reed at the same stage but with the computer scaling the reference measurements to 86%. Now the same point on the reed as before has a scaled reference of 44 and the colours once again show the best places to scrape if it needs to be made thinner.
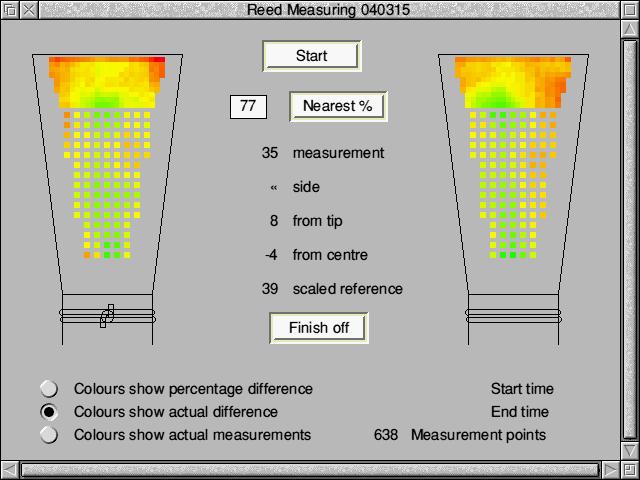
This is the reed as I last measured it. The computer has measured it 16 times at this stage and the reed averages at 77% of my reference measurements. These measurements were taken over a period of 9 days but often extend over months or years with my reeds.
I prefer to keep the red, ie too thin, parts of the reed to the edges rather than the centre for safety.
- Points to note:
- I am constantly squashing the first two wires one way or the other to optimise the playing characteristics that I need. I start with the throat fairly flat and only open it if I scrape off too much. Opening the throat can improve the top notes and make the sound brighter and the pitch sharper. Closing does the opposite. If the throat is too flat then the middle-E or C# (below middle-C) may go flat in an uncontrollable way in the loud passages. I find it best to adjust the reed so that this nearly happens. This makes the reed nice and free.
- Make sure that you scrape evenly at the edges and other places where you haven’t measured.
- I always smooth the inside of the tip of the reed with flattened Dutch rush or wet and dry paper. (You can flatten the rush after soaking until it is dark – it should dry flat without cracking. You may need to remove some pith from the inside at the joints.)
- I prefer to use a file for scraping rather than a knife as it is harder to dig holes in the reed accidentally! I have 2 half-round files; one is coarse and the other is a diamond file that is very good for smoothing and working at the tip and edges.
- I always rub my rush gently over the tip of the reed at 45° to improve the attack. If you still have problems with the reed not attacking then try scraping gently just on the first millimetre from the tip.
- When the reed is scraped evenly I still look for indications that some parts of the reed are stronger than others. Measuring doesn’t solve everything!
- If the reed feels rough even when you have smoothed it with fine wet and dry glass paper I sometimes rub my mandrel over the reed.
If this page doesn’t help or you have any suggestions, please send me a message.